After a three month break from the kit building routine, I am ready to fall back, into the flow of creating and using kits made using the inspiration of the monthly Counterfeit Kit Challenge. I busted through two kits last month (my May and June compilations) and disassembled a bonus kit I built a year ago, but never shared here or used in scrapping, (I really like building kits from my stash. Sometime I do it just because.) All that remains in my backlog of kits is the one from July, Community First. And I should be turning to it right now. Finish what you start and follow through responsibly with a wrap-up blog, says the analytical part of my brain. But it is the beginning of the month and that means a new inspiration kit to copy and well, you know how it is with us artistic types. Always want to look at what is new and pretty, and well, pretty and new.
Oh how pretty is this?


The inspiration kit is from Jenni Bowlin Learn all about the challenge here
I see blues and golds and textures that bring to mind crisp air, clear skies and crunchy leaves underfoot. Just perfect for the season. So to commemorate yesterday, Sunday, November 3, the day that we "fall back" off daylight savings time. And to recognize my renewed commitment as I fall back into a scrapping routine. I would like to present to you my November Counterfeit Kit Challenge kit, aptly named "Fall Back"

The usual start is with the papers.
 Top row: Three colours of cardstock from Close to My Heart (CTMH).
Multi-Striped, Dream Street Papers, Birdie Bits, Building A Home, Audrey Neal Designs.
The next two are from a stack that I think was by Deja vu.
Stacks seem to just sit there for me. I forget to look in them for papers. This summer I took apart most all of my stacks and resorted them into rainbow sections. As this kit shows, they are more apt to be used by me if they are sorted into colour families.
Bottom row: The first piece is an odd duck. About 20"x16" it is a folded piece of high quality paper, I found at a thrift shop. It is too heavy for gift wrap so I am guessing it originated in a craft/scrap kit.
Blue plaid, manufacturer unknown. (muk)
Scroll, again from the Deja vu stack.
Off white, Core'dinations Whitewash collection.
Blue diamonds, muk.
I wanted some more variety so made an add-on paper kit.
 Die cut Making Memories.
Lattice with corn motif, muk.
Multi pattern with dots, CTMH Dreamin'.
Floral, Basic Grey, Boxer, Slim Fit.
Borders pattern, Basic Grey, Boxer, Corduroy.
For Alphas, I added CTMH mini epoxy letters. I will use other alphas as needed.
Also a roll of washi. Why is it that the manufacturers don't put their name on the inside of the roll? I have only two rolls that identify their makers, and they were from a garden shop.
For messy technique, which I need to encourage myself to incorporate them by adding them to the kit. This month is stamps from Tim Holtz Collection, Stampers Anonymous, Artistic Collage
Then I decided to make it easy on myself. Rummaging through past kit remains, and half packs of die-cuts, I chose a selection that I though might work well for me, without worrying if they resembled the inspiration kit. My goal it to use up these hangers-on.

Some of the items shown are from the following;
Die cuts, Glitz Whatnot Vintage Blue.
Dimensional stickers, Forever in Time .
My Mind's Eye, Lost and Found Two, Rosy "Everything" Dry Goods patterned paper the "b" side. Will cut apart to use the vintage newspaper ads.

Layered stickers, My Mind's Eye, Follow your heart.
Odd bits and snips, Making Memories, Vintage Findings, Mini birthday kit.
Flowered buttons, H.A.Kidd , Inspire.
Rosettes, American Crafts, delights, Spice.
Slide mount frames, Hot off the press, Attachments, Travel.
Blue chipboard banner, Teresa Collins, Everyday Moments, Chipboard Elements.
Bingo cards and journal cards left overs from Simple Stories cut apart pages.
Borders, K&Company, Que Sera Sera.
Overlay, Seven Gypsies.
Glimmer glass, Tattered Angles, Regal.
Mirror bird, Heidi Swapp.
Asst. stickers, Glitz; Creative Memories.

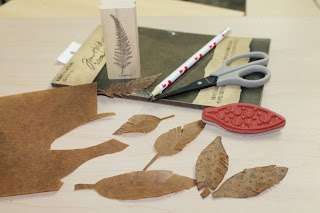
Glassine paper, Tim Hotz. From this I counterfeited feathers by stamping or free hand and fussy cutting.
Word/definition stickers, muk.
Burlap bag, salvaged from packaging.
Vintage look tags salvaged from Cactus clothes.

and a little bag found in my drawer with buttons, tickets, die cuts, lace, flair, fabric flower (Prima), ribbon, some bits of wood from packaging, etc. all in the brown/gold/orange part of the spectrum.
Journal cards I made using last months leftovers.
Finally a bag of word strips and mini alphas that came from the charity shop. muk.
I expect I will be reaching for ribbon and fibers, inks and punches. I usually do, so there isn't a need to include them to make sure they get used.
So now it's time to make a mug of cocoa, and flip though my photo storage albums. Find some good fall photos that have been waiting to be scrapped.
Thanks for stopping by. Double thanks for comments.
Oh how pretty is this?

And how scrumptious is the add-on?

The inspiration kit is from Jenni Bowlin Learn all about the challenge here
I see blues and golds and textures that bring to mind crisp air, clear skies and crunchy leaves underfoot. Just perfect for the season. So to commemorate yesterday, Sunday, November 3, the day that we "fall back" off daylight savings time. And to recognize my renewed commitment as I fall back into a scrapping routine. I would like to present to you my November Counterfeit Kit Challenge kit, aptly named "Fall Back"

The usual start is with the papers.

Multi-Striped, Dream Street Papers, Birdie Bits, Building A Home, Audrey Neal Designs.
The next two are from a stack that I think was by Deja vu.
Stacks seem to just sit there for me. I forget to look in them for papers. This summer I took apart most all of my stacks and resorted them into rainbow sections. As this kit shows, they are more apt to be used by me if they are sorted into colour families.
Bottom row: The first piece is an odd duck. About 20"x16" it is a folded piece of high quality paper, I found at a thrift shop. It is too heavy for gift wrap so I am guessing it originated in a craft/scrap kit.
Blue plaid, manufacturer unknown. (muk)
Scroll, again from the Deja vu stack.
Off white, Core'dinations Whitewash collection.
Blue diamonds, muk.
I wanted some more variety so made an add-on paper kit.

Lattice with corn motif, muk.
Multi pattern with dots, CTMH Dreamin'.
Floral, Basic Grey, Boxer, Slim Fit.
Borders pattern, Basic Grey, Boxer, Corduroy.
For Alphas, I added CTMH mini epoxy letters. I will use other alphas as needed.
Also a roll of washi. Why is it that the manufacturers don't put their name on the inside of the roll? I have only two rolls that identify their makers, and they were from a garden shop.
For messy technique, which I need to encourage myself to incorporate them by adding them to the kit. This month is stamps from Tim Holtz Collection, Stampers Anonymous, Artistic Collage
Then I decided to make it easy on myself. Rummaging through past kit remains, and half packs of die-cuts, I chose a selection that I though might work well for me, without worrying if they resembled the inspiration kit. My goal it to use up these hangers-on.

Some of the items shown are from the following;
Die cuts, Glitz Whatnot Vintage Blue.
Dimensional stickers, Forever in Time .
My Mind's Eye, Lost and Found Two, Rosy "Everything" Dry Goods patterned paper the "b" side. Will cut apart to use the vintage newspaper ads.

Layered stickers, My Mind's Eye, Follow your heart.
Odd bits and snips, Making Memories, Vintage Findings, Mini birthday kit.
Flowered buttons, H.A.Kidd , Inspire.
Rosettes, American Crafts, delights, Spice.
Slide mount frames, Hot off the press, Attachments, Travel.
Blue chipboard banner, Teresa Collins, Everyday Moments, Chipboard Elements.
Bingo cards and journal cards left overs from Simple Stories cut apart pages.
Overlay, Seven Gypsies.
Glimmer glass, Tattered Angles, Regal.
Mirror bird, Heidi Swapp.
Asst. stickers, Glitz; Creative Memories.

Glassine paper, Tim Hotz. From this I counterfeited feathers by stamping or free hand and fussy cutting.

Word/definition stickers, muk.
Burlap bag, salvaged from packaging.
Vintage look tags salvaged from Cactus clothes.

and a little bag found in my drawer with buttons, tickets, die cuts, lace, flair, fabric flower (Prima), ribbon, some bits of wood from packaging, etc. all in the brown/gold/orange part of the spectrum.
Journal cards I made using last months leftovers.
Finally a bag of word strips and mini alphas that came from the charity shop. muk.
I expect I will be reaching for ribbon and fibers, inks and punches. I usually do, so there isn't a need to include them to make sure they get used.
So now it's time to make a mug of cocoa, and flip though my photo storage albums. Find some good fall photos that have been waiting to be scrapped.
Thanks for stopping by. Double thanks for comments.


